Saturday, September 21, 2013

How to switch between IDE/RAID/AHCI without re-install of Win8/Win8.1

In this scenario, during the system boot when Windows tries to start, you will receive an error with regards to a system failure. The system will be stuck in a reboot loop. This is due to changes in Windows 8 PnP in which Boot Start Drivers are not installed by default.


Method#1: Switch between IDE<-->AHCI without going to safe mode.
- Enable the driver you need before changing the SATA mode setting in the BIOS:
-- Delete the entire StartOverride key (or tweak the value to 0) under      HKEY_LOCAL_MACHINE\SYSTEM\CurrentControlSet\Services\(DriverNameHere)
- Reboot to BIOS setup
- Enable IDE, AHCI or RAID mode

Method#2: Switch by going to safe mode once.
Open an elevated command prompt and set the machine to boot into Safe mode by typing
  1. bcdedit /set {current} safeboot minimal and reboot the machine.
  2. Go to BIOS and change your mode and boot to safe mode. Note: In Safe mode all boot-start drivers will be enabled and loaded. Since there is device installed to use it, the kernel will now make it part of the drivers that are to be loaded on boot and not disable it again.
  3. Reset the bcdedit settings to allow the machine to boot into the Normal mode by typing:
    bcdedit /deletevalue {current} safeboot
  4. Reboot the machine into Normal mode by typing:
    shutdown /r /t 0


Intel Rapid Storage, Rapid Start technology with msata module

Intel Rapid Start Technology improves the standard hibernation features. In addition, this feature is significantly faster than the standard operating-system based hibernation on the same solid state device (SSD) solution.

Requirements
In order to run Intel Rapid Start Technlogy, your computer must have:
 Rapid Start Technology enabled in the System BIOS
 An SSD primary drive or Hard Drive (HDD) plus an mSATA module SSD
 A healthy hibernation partition that must exist on the SSD prior to installation of the software

Note: Rapid Start Technology is not supported in the following configurations:
 When the computer only has a hard drive (HHD) with rotating media
 When the computer has a Self-Encrypted Drive (SED) or uses data encryption software

For Computers with SSD primary drives

Shrink the volume by 4096 using DM
Diskpart clean create primary partition
Set id=84 override (this will create hidden hibernation partition)
Not go to Intel Rapid start technology and turn it on set the default timer.
NOTE - If your primary drive is formatted as GPT instead of MBR (as is the case on most Windows 8
machines), type the following instead as shown below: Set id=D3BFE2DE-3DAF-11DF-BA40-
E3A556D89593


For Computers with HDD + mSATA module: 
1. Ensure the computer is in RAID mode. (ref. System BIOS Configuration above)
2. Prepare the mSATA module by cleaning it of any data using diskpart.
Enabling SRT:
Smart Response Technology must first be enabled before enabling Rapid Start Technology as follows:
1. From the desktop, click Start > All Programs > Intel > Intel Rapid Storage Technology.
2. Select the Accelerate button, and then click Enable Acceleration.
3. Select 18.6 GB for size allocated for the cache memory and Maximized mode for the acceleration mode.

Note: In Windows 7, you will already be in legacy mode. In Windows 8, you must also make sure that the computer is in UEFI Native mode in BIOS

how to sideload a metro app in Win8.1

You can only sideload apps on Windows 8.1 Enterprise edition (or on Windows 8.1 Pro and Windows RT devices by installing a special sideloading product key on the device).

Acquire a sideloading product key
Type the following command into the PowerShell window, press Enter, and agree to the license:

Show-WindowsDeveloperLicenseRegistration

After acquiring a developer license, you can run the following command in a PowerShell window to sideload a Modern application:

Add-AppxPackage C:\example.appx

You’ll need to purchase a “sideloading product activation key” from Microsoft. Microsoft directs people interested in purchasing these keys to their Volume Licensing page.

If you’ve acquired a sideloading product key, you must open a Command Prompt window with administrator access and add it with the following command, where ##### is the 25-digit key:

slmgr /ipk #####

After adding the key, type the following command exactly to activate the sideloading key:

slmgr /ato ec67814b-30e6-4a50-bf7b-d55daf729d1eappx

Enable sideloading on Win8.1 Enterprise EditionThere are additional requirements: the target computer must be joined to the corporate domain (unless you have installed a sideloading product key), the Group Policy setting "Allow all trusted apps to install" must be enabled; and the app must be signed by a trusted code-signing certificate

You must enable sideloading in Group Policy. This setting can be enabled on your domain or on your local computer.
For example, to enable this option on your local computer, press the Windows key, typegpedit.msc, and press Enter. Navigate to the Computer Configuration\Administrative Templates\Windows Components\App Package Deployment folder in the Group Policy editor.

Double-click the Allow all trusted apps to install option and set it to Enabled.


If you’ve satisfied all the requirements, you can sideload Modern apps by running the following cmdlet in a PowerShell window:
Add-AppxPackage C:\example.appx

Friday, September 20, 2013

How to create Windows 8.1/Win7 installation bootable USB for UEFI Install

The "Windows 7 USB/DVD Download Tool" is a very useful tool in making bootable USB from ISO file, but it doesn't work under UEFI system since the USB is in NTFS and UEFI can only boot from FAT32. Here is the steps to make a bootable USB for fresh clean install Windows 8.


Brief Steps: Format USB as FAT32 and Extract the ISO file to the USB

Detailed steps:

1. Format USB drive as FAT32 on a Win7/Win8 PC.
    diskpart.exe
    list disk (Find USB device)
    select disk 1 (make sure this is a USB)
    clean
    create partition primary
    select partition 1
    active
    format quick fs=fat32 
    assign 
    exit

2. Copy Windows 8 x64 ISO content to USB.
Option#1: If you already have winrar installed then select the win8.1 iso and extract to USB.


Option#2:  Mount Windows8.1 .iso(In this example, it's H:) Note, If using Windows 7, use your favorite ISO mounting software. Copy the content using xcopy <ISO drive> <USB drive>, for example.
    xcopy H:\* F:\ /s /e


Second option:
Rufus is a small utility that formats and creates bootable USB flash drives, but not DVD discs. What makes Rufus different is that it offers 3 different partition scheme to target the system type, such as those UEFI based computers. You can make a bootable drive that can directly boot off on a UEFI computer without turning the Secure Boot off.


For Win7 USB install make sure you meeting following requirement

Requirements:
  • 64-bit Windows 7 ISO or DVD (If you want to install Windows 7)
  • To boot from an external UEFI USB flash drive, be sure to temporarily disable Secure Bootand enable CSM in your UEFI/BIOS firmware settings until the Windows installation is finished.

HOW TO CREATE A UEFI WINDOWS 7 USB BOOT DISK
1) Download and install 7-Zip (get it here http://www.7-zip.org/download.html)
2) Extract the files from DVD or ISO file
3) Partition your USB Drive (optional) a. Open Command Window (CMD) as administrator b. diskpart c. list disk d. select disk NUMBER e. clean f. create Partition Primary g. select Partition 1 h. active i. format quick fs=FAT32 j. assign j. exit
4) Copy files from DVD or ISO to USB Drive
5) Make a directory “/efi/boot” on the USB Drive
6) Go to “/source/install.wim” open archive with 7-zip a. In the archive go to “/1/Windows/boot/efi” b. Copy file bootmgfw.efi to “/efi/boot” on USB Drive
7) Rename bootmgfw.efi to bootx64.efi in “/efi/boot”
8) Copy Files from “/efi/microsoft/boot” TO “/efi/boot

Tuesday, September 17, 2013

How to optimize Win 8.1 for work PC.

I moved from Win7 to Win8.1 this week. Win8.1 has lots of new features to make it an old style Win7 desktop PC. Many of these options aren’t enabled by default, so you’ll have to enable them yourself. I made following change and now I like Win8.1 ;)
  1.   Set 
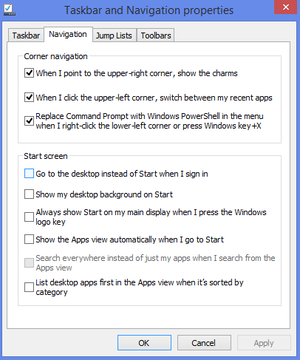
default boot to Desktop--> To enable this option, right-click the taskbar, select Properties, - Navigation tab, and check the “Go to the desktop instead of Start when I sign in” option.


2.  Start button is back: Microsoft hasn’t actually given us the Start menu back, but you can make the Start screen much less awkward now. I like the new start button and do not miss the traditional win7 start button now. If you really want to go back to tradition Win7 like start then you can you can still install Start8 on Windows 8.1 to get the traditional start menu back. http://www.stardock.com/products/start8/features.asp

3. Change desktop background to metro start background: Windows 8.1 deals with this by providing an option to “Show my desktop background on Start. It appears like a small change, but using the same background on your Start screen makes it feel much less out of place

4. Disable Annoying Hot Corners: For desktop users, some of the most important are the “When I point to the upper-right corner, show the charms” and “When I click the upper-left corner, switch between my recent apps” options. You’ll still be able to open the app switcher and charms with hotkeys (Windows Key + Tab and Windows Key + C) and by moving your mouse cursor to the bottom-left and bottom-right corners of the screen and moving it upwards along the edge. However, you’re much less likely to trigger these hot corners accidentally.

5. Change Start Screen into a Desktop Apps List First: check the “Show the Apps view automatically when I go to Start” option in the Navigation pane. Click the Start button and you’ll now see a list of your installed apps — no live tiles.

6. Use Unified Search - In Windows 8.1, you can simply press Windows Key + S to open the search sidebar and perform searches without leaving your desktop. Windows 8.1 now reunites Windows search into a unified experience. Search at your Start screen and Windows will search your installed apps, settings, and files without any clicking through different categories.


7. Change File Associations- To open it, press the Windows key, type Default, and press Enter. Click the Set your default programs link in the window that appears.


8. Open the Metro version of IE 11 in multiple windows- you can now have a single app open in multiple Snapped windows. Open the Metro version of IE 11 in multiple windows- you can now have a single app open in multiple Snapped windows

9. Wireless Miracast pairing: Windows 8.1. Like Android 4.2, Microsoft’s OS update includes full support for the fledgling Miracast wireless display standard, which basically acts like Apple’s AirPlay technology

10. New Printing: Win8.1 added support for NFC and print to 3D printer. You’ll be happy to hear that Windows 8.1 also includes Wi-Fi Direct printing capabilities.

11. Get Control on your apps: Navigate to the Search & Apps section once again, and select App sizes in the left-hand menu. The screen populates with a full listing of all your installed modern apps, complete with the file size of each app. If you’re looking to free up some hard drive space, you can click an app to bring up an uninstall option.


12. Turn off App Notifications: Fortunately, Windows 8.1 lets you silence the cacophony with its new Quiet Hours setting.Open the Settings charm, and navigate to Change PC Settings > Searchand apps > Notifications. Scroll down the page a bit until you reach Quiet Hours. By default, windows 8.1 is set to go silent from midnight to 6 a.m., but you can change the window to any time frame you desire.


     13. Some Useful Keyboard Shortcut:

1.    Windows Key + C: Displays Charms menu. 

2.    Windows Key + X: Brings up a menu of advanced system options, including Windows Control Panel, Command Prompt, Task Manager and File Explorer. 

3.    Windows Key + I: Displays the Settings menu for the current app. For example, if you’re in Internet Explorer 10, this key shows Internet options. If you’re on the Start menu, it shows general OS settings.

4.    Windows Key + Q: Brings up the apps search menu that allows you to search your list of installed programs.

5.    Windows Key + Tab: Brings up the Task Switcher and toggles between Windows 8-style apps.

6.    Windows Key + H: Brings up Share menu for the current app. For example, hitting Windows Key + H in Bing Maps, lets you email or share map information on social networks.

7.    Windows Key + M: Opens desktop mode and minimizes all windows.


8.    Windows Key + F: Opens universal search menu and sets it to search files.


9.    Windows Key +Number Key (1-9): Switch to desktop mode and make the Nth application on the task bar active where N is the number key you hit and 1 is the furthest taskbar icon to the left.

10. Windows Key + . (period key): Docks the current Windows 8-style application to the right or left, depending on how many times you hit it.

Need More shortcuts, visit here - http://www.hongkiat.com/blog/windows-8-keyboard-shortcuts/


Saturday, September 14, 2013

Win8- Different ways to enable safe mode and other advanced boot options

Windows 8 introduced a completely new boot manager/boot loader. Another new thing that was introduced in Windows 8 is the ability to Refresh/Recover your PC to the original state or to the state that you defined.
This new design has disabled the old style advance boot options, like safe mode and Last Good known configurations.

So, I like to enable advanced boot option in Windows 8. How? That's easy :)

Method 1: UI Way - but only for one time
Click “Restart” while holding down the left Shift key
Choose “Troubleshoot”
In the Advanced Options window, click “Startup Settings”


The boot menu shown select safe mode


Method#2 
press [Windows]+R to bring up the Run dialog box, type msconfig and click OK


Method #3 (Enable all advance boot option -F8 style permanently)

Enter this command:  bcdedit /set {default} bootmenupolicy legacy

If you would like to disable the F8 key and go back to the original Windows 8 setting you can open an elevated command prompt and enter the following command: bcdedit /set {default} bootmenupolicy standard

The following command will enable the BLUE Advanced Boot Options screen (NOT the Win7, black and white screen) to be shown at every boot:
BCDEdit /SET "{bootmgr}" displaybootmenu yes
bcdedit /set {globalsettings} advancedoptions true

To disable this/restore defaults, run one of the following commands:

bcdedit /set {globalsettings} advancedoptions false
or
bcdedit /deletevalue {globalsettings} advancedoptions.


LKG is not visible in advance option? Do this:
Enable Last Known Good Configuration:
1. Enable the LKG feature:
under the key HKLM\SYSTEM\CurrentControlSet\Control\Session Manager\Configuration Manager\LastKnownGood create a DWORD value "Enabled" and set it to 1

2. Configure how many copies of ControlSet can be created, 2 is enough.

under the key HKLM\CurrentControlSet\Control\Session Manager\Configuration Manager\ create a DWORD value "BackupCount" and set it to 2.

Sunday, September 01, 2013

Windows Advance boot option and how to use them.

This is my preference for how to use the Windows Advance Debugging options.

  • Last Known Good Configuration (advanced) The Last Known Good Configuration (advanced) option starts Windows with the drivers and registry data that were recorded the last time Windows was successfully started and then shut down. This tool on the Advanced Boot Option menu is a great thing to try first, before any other troubleshooting, because it returns a lot of really important configuration information back to a time when Windows worked. If a start-up problem you're having is due to a registry or driver change, Last Known Good Configuration could be a really simple fix.


  • Safe Mode (s)Starts Windows with the minimum of drivers and services possible.Safe Mode with Networking: Same as Safe Mode, but also includes drivers and services needed to enable the network. Safe Mode with Command Prompt: Same as Safe Mode, but loads the Command Prompt as the user interface.  In general, try Safe Mode first. If that doesn't work, try Safe Mode with Command Prompt, assuming you have command-line troubleshooting plans. Try Safe Mode with Networking if you'll need network or Internet access while in Safe Mode.
  • Disable automatic restart on system failure The Disable automatic restart on system failure option stops Windows from restarting after a serious system failure, like a Blue Screen of Death.If you can't disable automatic restart from within Windows because Windows won't fully start, this Advanced Boot Option suddenly become very useful.
  •  Enable Boot Logging The Enable Boot Logging option will keep a log of the drivers being loaded during the Windows boot process. Type msconfi and select boot loging. If Windows fails to start, you can reference this log and determine which driver was last successfully loaded, or first unsuccessfully loaded, giving you a starting point for your troubleshooting. The files are named either ntbtlog.txt or bootlog.txt, depending on how old your PC is. These files, found in the Windows folder, list the success or failure of various pieces of Windows as it’s loaded into memory from the PC’s mass storage system. Note: The boot log is overwritten every time you start Windows. 

  • Debugging Mode The Debugging Mode option enables debug mode in Windows, an advanced diagnostic mode where data about Windows can be sent to connected "debugger."

Some other useful modes for specific problems:

  • Disable Driver Signature Enforcement The Disable Driver Signature Enforcement option allows drivers that are not digitally signed to be installed in Windows.

  • Directory Services Restore Mode The Directory Services Restore Mode option repairs the directory service. This tool on the Advanced Boot Options menu is only applicable to Active Directory domain controllers and has no use in a normal home, nor in most small business, computer environments.

  • Enable low-resolution video (640x480) The Enable low-resolution video (640x480) option decreases the screen resolution to 640x480, as well as lowering the refresh rate. This option does not change the display driver in any way. This Advanced Boot Option tool is most useful when the screen resolution has been changed to one that the monitor you're using can't support, giving you an opportunity to enter Windows at a universally accepted resolution so you can then set it to an appropriate one.

How to fix BSOD 0x0000007B on Win7 and Enable Ide, Ahci, Raid mode without re-installing.

When you convert an already installed Win7 Image in to a Virtual Image or if you do a complete PC restore from one machine to another- you might face the 0x0000007B Stop error.  This will happen in a loop and you have to disable the Auto Restart to see the blue screen error code.  When this error appears windows does not create any memory crash dump because a device driver that the computer boot controller needs is not configured to start during the start-up process.


The hitch is that drivers are there but not enabled in an effort to improve boot performance. Only the one required driver (Ide, AHCI, RAID) is loaded to save the boot time.

After trying couple of things for hours I came up with following steps that consistently worked for me:

Boot to Baremetal Windows ( If it’s a VHD then mount the VHD)
Depending on what interface you have, you need to change the start value of corresponding registry entry to load the driver. If the value is 3, that driver would not load.  So if you are going from AHCI to IDE, which is the case in most of P2V then
Open regedit.  
[HKEY_LOCAL_MACHINE\SYSTEM\ControlSet001\Services\IntelIde]
Change the data for value "Start" from "3" to "0".
6a.Also repeat for: HKLM/System/CurrentControlSet001/Services/ and edit the "Start" parameter to the corresponding value from the list:
Aliide = 3
Amdide =3
Atapi = 0
Cmdide = 3
iaStorV = 3
intelide = 0
msahci = 3
pciide = 3

viaide = 3

Also check these two reg entries
[HKEY_LOCAL_MACHINE\ControlSet001\Control\CriticalDeviceDatabase\pci#ven_8086&dev_7111] "ClassGUID"="{4D36E96A-E325-11CE-BFC108002BE10318}" "Service"="intelide"
[HKEY_LOCAL_MACHINE\ControlSet001\Control\CriticalDeviceDatabase\pci#ven_8086&dev_7110&cc_0601] "ClassGUID"="{4D36E97D-E325-11CE-BFC1-08002BE10318}" "Service"="isapnp"


==

How to Switch between IDE/AHCI/RAID


Switch between IDE/AHCI/RAID

The registry changes which allow you to switch between Ide, Ahci and non-member raid modes in windows 7 using a single disk without re-installing 

Go into the registry using regedit and change each of the "start" values in the registry keys below from 3 to 0 and this will allow you to change between the different modes by just changing the option in your Bios each time you reboot.

HKEY_LOCAL_MACHINE\SYSTEM\CurrentControlSet\services\pciide

HKEY_LOCAL_MACHINE\SYSTEM\CurrentControlSet\services\msahci

HKEY_LOCAL_MACHINE\SYSTEM\CurrentControlSet\services\iaStorV


HKEY_LOCAL_MACHINE\SYSTEM\CurrentControlSet\services\Intelide

==
Use windows7 recovery console to change the registry
Boot from win 7 install disk, choose recovery, and command prompt.
Open the registry editor: regedit
This loads the registry editor with a temporary registry, not the windows registry from the hard disk.
Select HKEY_LOCAL_MACHINE in the registry tree, and go to the File menu and choose "Load Hive".
Open the registry hive file SOFTWARE from the location: C:\Windows\System32\Config
Give it a random name different to any of the existing names (the name doesn't matter).
Make the necessary changes to the registry hive.
Select the registry hive you edited, go to File, and choose "Unload Hive".
Then exit the recovery console and restart. The registry should have been changed.